
Hi everyone,
We are back with the third and last part of our Ingress networking series. In this final installment, we focus on how we solved the DNS problem(s).
In Part II we showed you how MetalLB solved the dynamic routing problem for us. At that point, users were able to connect their containerized workloads to the outside of the cluster in a self-service fashion. The next component we needed to make our Ingress service even more user-friendly was a dynamic DNS solution.
Dynamic DNS for Ingress Services
MetalLB only provides IP addresses for us to interact with. While this is a good start, IP assignment is dynamic so any given service could receive a different IP address every time it is redeployed. What we really want is a dynamic DNS service that connects a DNS record to the MetalLB IP address.
The good news for us is that this kind of requirement is nothing new and there are several OpenSource projects out there that solve the problem for us. We opted for the ExternalD NS project. External DNS works in a similar way to the internal CoreDNS. It is written in Go, which works pretty smoothly with containers – we only need to put the static compiled binary into the container and no other dependencies are needed. It hooks into the Kubernetes API and watches for Services and Ingress objects. It can then transform this information into DNS records. External DNS supports a wide range of DNS providers.
- Google Cloud DNS
- AWS Route 53
- AWS Service Discovery
- AzureDNS
- CloudFlare
- RcodeZero
- DigitalOcean
- DNSimple
- Infoblox
- Dyn
- OpenStack Designate
- PowerDNS
- CoreDNS
- Exoscale
- Oracle Cloud Infrastructure
- Linode DNS
- RFC2136
- NS1
- TransIP
- VinylDNS
And new providers and features are always being added.
As our focus was finding a solution that works for our internal network, all public hosting services were immediately discounted. This considerably reduced our list of potential services. We wanted to take a closer look at the CoreDNS integration as we already had CoreDNS running as the Kubernetes internal DNS service. So all we needed were ExternalDNS and CoreDNS, and then it would just work? Sadly, it wasn't that easy. We soon realized we needed an additional component to make it work. The complete setup looks like this:

The idea here is to run all three components inside one Pod. Admittedly this doesn’t conform to the concept of a microservice, but, in our case, it makes things markedly easier. Of course, we still need multiple replicas for this one Pod for resilience. The first container in our Pod runs ExternalDNS. It calls the Kubernetes API, fetches all Ingress and Service objects, and transforms them into DNS A records or CNAMES (depending on the object type and some annotations). This is when the new component kicks in: ETCD. ETCD is a distributed key value store which is perfect for storing the output of ExternalDNS. The third container runs CoreDNS. CoreDNS is a super-lightweight DNS with a flexible plugin structure. We use the ETCD plugin to connect CoreDNS with ETCD. When a DNS query hits CoreDNS, it checks to see if there is a matching entry inside ETCD.
For the last piece of the puzzle, we needed to understand how clients/other services query for DNS services. By default, all systems in the internal network should first ask the corporate DNS servers, which is perfectly fine, and behavior we didn't want to modify. Instead we came up with the idea of setting up a DNS delegation that forwards queries that match some of the criteria entered. Essentially, this approximates to forwarding every query for a specific domain or subdomain. In our case, we forwarded everything for *.pke.example.com (we will come to the DNS concept later). So, the client asks the corporate DNS for a record in pke.example.com. The corporate DNS server sees that it is not responsible for that subdomain but knows which server is. The query is forwarded to our CoreDNS server. The CoreDNS tries to answer the query before sending it back to the corporate DNS, which then sends it back to the client.
Adopting the “eating your own dog food” mentality, we used MetalLB to expose our CoreDNS server to the outside of our cluster.
Controlling DNS with Kubernetes objects
Now let's take a look how this service can be consumed from the perspective of a Kubernetes user. Let’s refer back to our wordpress example from parts I and II:

Remember, we needed to set type: LoadBalancer to expose the service to the outside. ExternalDNS will only scan for services of that type. Next, we want to give our service a custom name: to do this, all we need to do is to add an annotation with the key ‘external-dns.alpha.kubernetes.io/hostname’ and the hostname under which we want our service to be reachable as a value. After applying the service object, we should see something like this in our ExternalDNS log:

That looks quite good. Our service was found, and an A record was created and stored in ETCD. Now we want to ask our CoreDNS directly to see if we can query the service.

And ta-da, it works! To test the delegation, we can start a normal DNS query from one of the clients inside the P7 network:

That works too. But wait, didn't we want an Ingress object for this?
The new and shiny Ingress setup
We mentioned the Kubernetes Ingress object back in Part I of this series. This is an object that is connected to a service object. Ingress can provide additional load balancing features, SSL termination, name-based and path-based virtual hosting, and much more. For all Layer 7 traffic, the Ingress objects are preferable to normal service objects.
In our old architecture we used the Nginx ingress controller. Nginx was born in 2002, a loooong time before we considered Kubernetes. At its core, it is a webserver and a reverse proxy. And over the years it grew many new features, but it was never designed to work in an environment as dynamic as Kubernetes. To make it work as an Ingress controller, the community built a helper daemon that runs in the same container. This helper connects to the Kubernetes API, gathers all Ingress objects, and translates them into Nginx configs. Afterwards it renders the config into the local file system of the container. Finally, it also reloads Nginx to apply the latest changes. Doesn’t feel very 2019, right?
Choosing a new Ingress controller was also not that simple a task. We saw and are still seeing a lot of (new) projects in this field, especially around the latest buzz word: service mesh. Our requirements were:
- Open Source
- Kubernetes as a first-class citizen
- Config updates without interruptions
- Basic authentication
- Path- and Host-based routing
- Different load balancing algorithms
- WebSocket, GRPC and HTTP/2 support
- Native Prometheus integration
- ACME support
- Easy operation
We ended up choosing the Traefikproject as it fulfilled all our requirements. Not only does it offer additional features that helped us with the migration, these features should also prove useful in future use cases.
Now let's look at the setup. The old Ingress controller needed to run as a Kubernetes DaemonSet, which meant one Pod per Node. This constraint was created by the hardware load balancer and the static configuration. If the Ingress controller doesn’t run as a DaemonSet, there is no way to predict on which Kubernetes node in the cluster the Pod will spawn. With MetalLB, that constraint has been eliminated. We can deploy our Ingress controller as a Deployment with replicas greater than or equal to two. This is awesome, as it saves a lot of resources and we can now autoscale the Ingress controller with the Pod vertical autoscaler based on custom Prometheus metrics
Configuring Traefik was also fairly straightforward. First, we needed to configure entry points. Since Traefik routes primarily http(s) traffic, we needed to define the standard ports 80 and 443:

We also configured a redirect to force https on every connection we open. This feature existed on the old Ingress setup but was configured on the hardware Load-Balancer. Next, we needed to supply some certificates for the https connection:

At the moment, we’re using static wildcard certificates. In the future we hope to automate the whole certificate chain (with Cert Manage) and or Hashicorp Vault /Let's Encrypt). The good thing here is that we can add as many certificates as we want. We’ll need this feature later on when we explain the domain structure. Then, we needed to configure the Kubernetes integration:

The ingressClass is used to determine if this Kubernetes Ingress object should be processed by our Traefik controller. This is perfect for our migration scenario and may be useful for future use cases. This enables us to run multiple Ingress controller types in one cluster without conflicts. The labelselector is used to select the Traefik deployment. This can be handy when there are multiple Traefik controllers. A possible scenario would be when you want to provide separation for different network zones. One controller could be used to avoid access from the LAN and another controller would be the entry point for connections that come from a cloud provider over a direct connection.
How to use the Ingress
Using Traefik is quite simple. Since all implementation details are hidden by Kubernetes, we just use the normal Ingress object with two additions:

We need to use the label selector pke.fhm.de/ingress-type: traefik-lan and the Ingress class kubernetes.io/ingress.class: traefik-lan . We don't need the annotation from the service object external-dns.alpha.kubernetes.io/hostname any more. For Ingress objects, ExternalDNS picks up the ‘host’ field and uses this information to build a DNS record.
Our service now becomes available at https://mycms.myproject.pke.example.com . When querying the DNS service again, we see something like this:
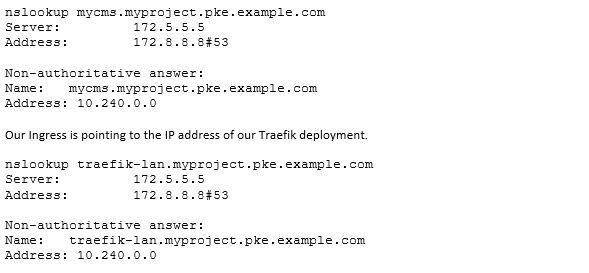
To make a routing decision the requests need to hit Traefik on port 80 or 443. Traefik then takes a look at the host header field as well as the requested path to redirect the traffic to the desired backend service (when a rule matches). From a technical point of view, our new infrastructure works. The only challenge left is how to separate and scale our approach so that all our development teams can use it?
Finding a DNS domain concept for multi-cluster/multi-team/projects
With our old Ingress structure, we only had one single subdomain per Kubernetes cluster. As our service grew, we noticed that this wasn’t really suitable. We had some conflict with the common services that every team needed. For example, every team wanted a separate Prometheus instance. For various reasons, the service must be reachable from the outside and, of course, people wanted a URL that is easy to remember. The problem was that our central Prometheus was already running on https://prometheus.domain.pke.example.com. So when a new team wanted to expose their Prometheus they needed to use URLs like https://prometheus-
To improve this situation, we introduced a new DNS domain structure.

There are two DNS trees in this picture. One is for internal usage (within the P7S1 network) and one is for external usage (reaching things from the internet). There’s also an option for adding more DNS trees in the future, which gives us flexibility to react to new requirements. For now, let's focus on the internal model. At the starting point of the tree we have the root zone: in our case, this is ‘fhm.de’. This is managed by our central network team and the central DNS infrastructure.
The next level is our PKE subdomain. Entries on this level are mainly virtual machines, bare metal servers, or services that don't run in containers (there are still some left, believe it or not!). This level is still managed centrally and we don't have direct control over it. The third level in the tree is the business level and represents the business domains within the company. It felt quite natural to us to follow the structure of our organization – we already do this when setting up new Kubernetes clusters. Entries on this level are mostly shared services such as the central logging system (present on each cluster and therefore on each domain), messaging systems like Apache Kafka, or the central Prometheus services (which gathers base metrics for containers). This level is fully and automatically managed by our external DNS + ETCD + CoreDNS combination.
The last level is the project/service level. As any given business domain is comprised of many teams, projects, and services, this level exists to separate them. This level is managed in the same way as the business domain level. One downside we noticed very quickly was that the URL suffix was rather long. For example the prefix for the project in the marketing domain team was ‘
As always, if you have questions or any other comments, please feel free to email us at peo@p7s1.net.
Many thanks, your PEO team.